Bush Flying 101: Essential Tips for Your First Outback Trip
- Nov 27, 2025
- 18 min read
Updated: Feb 16
The Call of the Red Dirt: Bridging the Gap Between City Circuits and Outback Airstrips
The dream of the Australian pilot is almost universally painted in ochre. It is the vision of banking a Cessna 172 over a vast, sun-baked landscape, the city skyline a distant memory, replaced by the endless horizon of the Never-Never. It is the allure of the "Pub Crawl" by air, landing on a dusty strip behind a tin-roofed hotel in Birdsville or William Creek, taxiing up to the front gate, and washing the dust down with a cold schooner while the engine ticks cool in the silence of the desert.
For students training at Bankstown, Moorabbin, Archerfield, or Jandakot, this dream often feels a world away from the reality of controlled airspace, rigid circuit patterns, and the comforting voice of ATC guiding every turn. You learn to fly in an environment of structure and predictability. The runway is sealed, the windsock is illuminated, and if you get lost, a radar controller is usually just a radio call away.
But out there, past the Great Dividing Range and beyond the wheat belt, where the green fades to brown and then to a brilliant iridescent red, the rules of engagement change. The physics of flight remain the same, but the application of airmanship shifts dramatically. The bush bites back if you aren’t prepared.
This report is your bridge. It is designed to take the fundamental skills you have learned in your RPL and PPL training and adapt them for the rugged, unforgiving, yet spectacularly rewarding environment of the Australian Outback. We will strip away the safety net of the city airport and replace it with the tools of the bush pilot: judgment, observation, and an unwavering respect for the landscape.
We will explore the nuance of navigation when the iPad overheats and shuts down. We will dissect the art of assessing a dirt strip that hasn’t seen a grader in three years. We will look at the weather not just as a METAR code, but as a living force that can tear the wings off a careless aircraft or provide a smooth ride if you know when to fly. And we will talk about survival—not just the box you tick on the flight plan, but the reality of staying alive when the engine stops in the middle of nowhere.
This is Hangar Talk at its deepest level. It is the wisdom passed down from station pilots, musterers, and mail run aviators, distilled into a guide for the city pilot ready to spread their wings.

Part 1: The Psychology of the Bush Pilot
Before we touch the controls or fold a map, we must address the most critical component of the aircraft: the pilot. The transition from a city training environment to remote operations requires a fundamental shift in psychology.
In the training area near Camden or Tooradin, your safety culture is externalized. It is enforced by regulations, instructors, and the proximity of infrastructure. If you have a rough running engine, you can likely glide to a paddock that has mobile phone reception. If you get disoriented, you can tune a VOR or call Centre. In the Outback, your safety culture must be internalized.
The Myth of the "Bold Pilot"
There is a persistent romanticism in aviation circles about the "Bush Pilot." Popular culture depicts them as swashbuckling risk-takers who fly by the seat of their pants, ignoring rules and pushing aircraft to their limits. This image is dangerous and, frankly, wrong. The adage "There are old pilots and there are bold pilots, but there are no old, bold pilots" is never truer than in the remote Australian interior.
The true bush pilot—the station manager flying a C206 to check bores, or the mail pilot navigating the Cape York run—is the most conservative aviator you will ever meet. They operate in an environment where help is hours or days away. They do not take risks because the consequences of a mistake are not just an embarrassing call to the Chief Flying Instructor; they are existential.
To fly safely in the bush, you must adopt a mindset of profound pessimism regarding the environment and profound optimism regarding your preparation. You must assume the strip is shorter than reported. You must assume the wind will change. You must assume the fuel bowser at the remote roadhouse is broken. By anticipating failure, you ensure success.
The "She'll Be Right" Trap
The Australian vernacular is famous for the phrase "She'll be right." It speaks to our laid-back nature and resilience. In aviation, however, "She'll be right" is a tombstone epitaph.
When you are planning a flight from Broken Hill to Tibooburra, and the forecast suggests marginal VFR with rising dust, "She'll be right" is not a valid risk assessment. When you are looking at a clay pan that looks mostly dry but has a few dark patches, "She'll be right" will leave you inverted in the mud.
You must replace "She'll be right" with "Is this right?" Continual interrogation of your situation is the hallmark of good airmanship.
Part 2: Navigation in the Never-Never
The Myth of Featureless Terrain
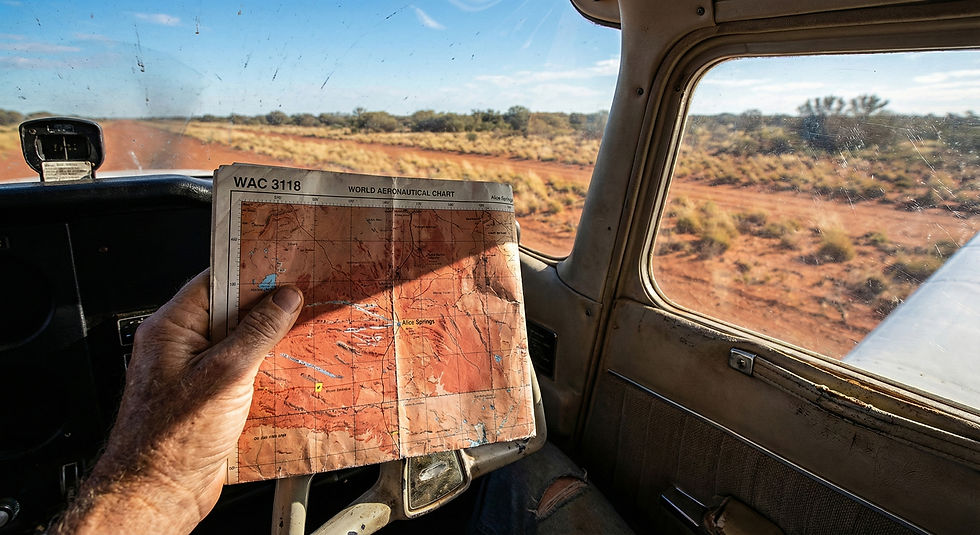
One of the most common anxieties for city pilots heading west is the concept of "featureless terrain." You look at the World Aeronautical Chart (WAC), and vast swathes of it are coloured in a uniform tan, marked only by the occasional "sand ridges" or "dense scrub." It looks terrifyingly empty compared to the cluttered VTC of the Sydney Basin.
However, to the trained eye, the Outback is never truly featureless. It is a canvas of subtle clues. The "emptiness" is a matter of scale. When you are flying in the city, you navigate by suburbs, highways, and shopping centres. In the bush, you navigate by geology and subtle shifts in vegetation.
The Hierarchy of Landmarks
In the remote Outback, man-made features are gold, but they are rare. When you plan your route, you must learn to prioritize landmarks differently than you do on the coast.

1. The "Handrails": Roads, Rivers, and Railways A "handrail" is a linear feature that you can follow or fly parallel to. In the Outback, a road might be the only sealed surface for 500 nautical miles. The Stuart Highway, the Barkly Highway, the railway line to Alice Springs—these are the spines of outback navigation.
When planning a long leg over remote country, it is often worth adding ten minutes to your flight time to dogleg via a major road. This provides two massive safety benefits:
Navigation: It is impossible to get lost if you are following the bitumen. Even unsealed trunk roads are highly visible against the red earth.
Survival: If you have an engine failure, a highway offers a potential landing site (emergency only) and, crucially, a source of immediate rescue from passing trucks or grey nomads.
2. The "Funnels" A funnel is a combination of features that "catch" you and guide you to a point. Imagine you are flying towards a station airstrip. It’s a tiny speck in a massive paddock. However, if that station is bounded by a river to the north and a fence line to the west, you can aim into the "funnel" created by these two features. You don't need to see the strip immediately; you just need to fly until you hit the river, then turn along it until you hit the fence.
3. Salt Lakes: The Deceptive Beauties Salt lakes are among the most prominent features on an Australian WAC chart. Lake Eyre, Lake Frome, Lake Torrens—they dominate the landscape. From the air, they are blindingly white and can be seen for fifty miles. They make excellent gross error checks. If you are supposed to be flying north and the massive white expanse of Lake Torrens is on your right instead of your left, you have made a serious error.
However, salt lakes change. A salt lake depicted as a solid shape on a chart might, in reality, be a series of disjointed pans depending on recent rain. In the Wet Season, they fill with water and change colour from white to pink or blue, blending with the sky. Never rely on the exact shape of a salt lake’s edge for precision navigation; use them for general orientation.
The Tyranny of the iPad: Why Paper Still Matters
In the modern cockpit, Electronic Flight Bags (EFBs) like OzRunways and AvPlan are ubiquitous. They are incredible tools. They provide situational awareness that pilots of the 1970s would have killed for. But in the Outback, they have a fatal flaw: Heat.
The cockpit of a Piper Warrior or Cessna 172 is effectively a greenhouse. In the Outback summer, temperatures at 3000ft can still be in the high 30s or low 40s Celsius. Direct sunlight on the back of an iPad will cause it to overheat and shut down in minutes.
Scenario: You are twenty miles from Tibooburra. The turbulence is moderate. You are sweating. Suddenly, your iPad screen goes black and displays the dreaded temperature warning thermometer. You are now flying blind if you do not have a backup.
This is why carrying and knowing how to use current paper WAC charts is non-negotiable for remote operations.
The WAC Chart (1:1,000,000)
The World Aeronautical Chart is the standard for outback navigation. At a scale of 1:1,000,000, it covers a massive area. One inch on the chart equals roughly 14 nautical miles. This scale is perfect for long transits but requires a mental shift from the 1:250,000 scale of a VTC.
Key Skills for WAC Navigation:
Thumb Flying: Keep your thumb on your last known position on the map. Move it only when you have positively identified the next feature.
The 1 in 60 Rule: In the bush, you don't have VORs to track. You have a heading and a stopwatch. If you drift 1 mile off track in 60 miles, your track error is 1 degree. If you are 5 miles off after 60 miles (a more likely scenario given the winds), you are 5 degrees off. Correct it immediately.
Time Gates: Break your long leg into 30-minute segments. Mark a "Time Gate" on your chart—a feature you expect to cross at that time. If you hit the time gate and don't see the feature, don't press on. Orbit. climb. Re-orient yourself. Pushing on into featureless terrain when you are uncertain of your position is the beginning of a disaster sequence.
The Sun Compass
One of the oldest bush tricks is using the sun. In the southern hemisphere, the sun rises in the east, moves through the north, and sets in the west.
Morning: Sun is North-East.
Midday: Sun is North.
Afternoon: Sun is North-West.
If you are flying West in the morning, the sun should be behind your right shoulder. If it’s shining in your eyes, you are flying East. It sounds primitive, but when the directional gyro (DG) precesses and the iPad dies, the sun is the one instrument that never fails.
Part 3: The Art of the Strip Assessment
The defining moment of any outback flight is the arrival. You aren't joining a standard circuit at Archerfield with a sealed runway and a tower controller. You are arriving at a station track, a clay pan, or a shire airstrip that might serve the Royal Flying Doctor Service (RFDS) once a month.
The surface is unknown. The wind is unknown. The obstacles are unknown. You have to build your own picture of safety in real-time. This process is called the Strip Assessment, and it is the most critical skill you will learn.
The High Pass, Low Pass Technique
Never, ever land on a bush strip straight from the cruise. It doesn't matter if you called the station manager yesterday and he said it was "fine." His definition of "fine" is for a Toyota Landcruiser, not a tricycle-gear aircraft with fragile wheel spats.
The industry standard procedure is the "High Pass, Low Pass" method.
1. The High Pass (2000ft AGL)
Arrive overhead the field at least 2000ft above ground level (AGL). This altitude keeps you clear of the circuit traffic (if any) and gives you a broad perspective.
The "W.O.L." Check:
W - Wind: Look for the windsock. If there isn't one, look for secondary indicators.
Smoke: Is there a burn-off nearby?
Dust: Is a vehicle moving on a track? The dust plume will trail downwind.
Water: If there is a dam, the calm side is the upwind side. The rough, rippled side is downwind.
Trees: In strong winds, the leaves turn over, showing their lighter undersides.
O - Obstacles: Look for the "killer" items. Power lines are the biggest threat. They are often invisible against the earth. Look for the poles (black or white sticks) and assume there is a wire between them. Look for towers, stock fences crossing the threshold, and tall trees on the approach.
L - Length and Layout: compare the strip to your charts. Does it look long enough? Is it a one-way strip (e.g., landing uphill, taking off downhill)?
2. The Low Pass (500ft AGL or Lower)
Once you have determined the active runway direction and general layout, descend on the "dead side" of the circuit and position for a Low Pass. This is flown exactly like a landing approach, but you fly along the runway, offset slightly to the right (so you can look out the left window), at a safe height—typically 100ft to 500ft depending on obstacles and your comfort level.
The "S.O.S." Check:
S - Surface: This is the money shot. You are looking for specific hazards that are invisible from 2000ft.
Green Spots: In the red dirt, a patch of bright green usually means moisture. It means mud. Do not land on green spots. A bogging in a remote area is an insurance nightmare and a survival situation.
Ant Hills: Termite mounds can be hard as concrete and stand 30-50cm high. Hitting one will shear off a nose strut. Look for the dark red/brown mounds casting small shadows.
Animal Holes: Wombat or rabbit warrens can collapse under the weight of a wheel.
O - Obstacles (Close Up): Re-check for fences. Farmers often put temporary electric fences across rarely used strips to manage grazing. Look for the thin wire or plastic tape.
S - Stock: Cattle, kangaroos, and emus.
Cattle: They generally move slow. A low pass with a burst of engine noise might clear them, but they can be unpredictable.
Kangaroos: The erratic suicide bombers of the bush. They are most active at dawn and dusk. If the strip is covered in roos, do not land. Go to your alternate. You cannot herd roos with an airplane; they will panic and jump into your propeller.
Emus: They run in straight lines but are fast.
The Decision: After the low pass, climb away back to circuit height. Make your decision. If you saw anything that made you uncomfortable (a washout, a deep rut, a roo bar), do not attempt to land. The bush pilot’s mantra is: "It is better to be in the air wishing you were on the ground, than on the ground wishing you were in the air."
Reading the Dirt: Surface Types
Red Clay: Hard and smooth when dry, slippery as grease when wet. The classic outback surface.
Black Soil: The enemy. Black soil plains (common in NW NSW and QLD) crack open when dry (cracks big enough to swallow a wheel) and turn to impassable glue when wet. Avoid unless you have local advice.
Gravel: Good drainage, but noisy. Propeller damage (stone chips) is a real risk. Do your run-ups on the roll or over a clean patch to avoid sucking stones into the prop.
Salt Pans: Generally hard, but the crust can be thin. If you break through the crust, you are in bottomless black mud. Only land on salt pans that are known, marked, and active airstrips. Never assume a random lake is landable.
Part 4: Meteorology of the Red Centre
Weather in the Outback is a different beast to the coastal weather patterns. You trade the coastal sea breezes and stratus clouds for intense thermal heating, dust, and the volatility of the tropics.
The Heat and Density Altitude
The most insidious threat in outback flying is heat. It’s 2:00 PM at a remote strip. The temperature is 42°C. The elevation is only 1000ft AMSL, but the Density Altitude (the altitude the wing feels like it’s at) might be 4,500ft or more.
The Impact:
Take-off Roll: Your take-off roll will increase significantly. A C172 that gets off in 300m at Bankstown might need 700m in the heat. The engine is producing less power, the propeller is biting less air, and the wings are generating less lift.
Climb Performance: Your climb rate will be anaemic. You might struggle to get 300-400 feet per minute. In the event of a downdraft (sink), you may not be able to climb at all.
Engine Cooling: The air is thin and hot. Engine oil and cylinder head temperatures (CHT) will redline quickly during a slow, high-power climb.
The Strategy: Fly early. The "Bush Pilot's Day" starts at first light. You take off at 06:00, get your flying done by 11:00 AM, and spend the heat of the day in the pub or under a wing. Taking off in the middle of a 40-degree day is hard on the engine and dangerous for the airframe.
Dust Devils (Willy Willies)

These are not cute little swirls of leaves. In the Outback, a Willy Willy is a thermal vortex that can extend thousands of feet into the air and contain wind speeds comparable to a small tornado.
They are visible as columns of red dust. If you fly through one, the turbulence can be violent enough to cause structural failure or loss of control, especially near the ground.
Operational Tips:
On the Ground: If a Willy Willy crosses the strip while you are taxiing, stop. Turn the aircraft into the wind if possible, hold the brakes, and wait. Tie the aircraft down immediately after parking.
In the Air: Avoid them by a wide margin. The invisible turbulence extends well beyond the visible dust column.
Landing: If you see dust devils on the approach, it indicates severe thermal activity and potential wind shear. Be prepared for a high-energy go-around.
The Wet Season (The Top End)
If you are venturing north of the Tropic of Capricorn (e.g., Longreach, Mt Isa, Darwin) between November and April, you are in the Wet Season.
Thunderstorms: Massive supercells form almost daily. They are often isolated but can link up into squall lines hundreds of kilometers long. They bring torrential rain, hail, and damaging winds.
Visibility: The humidity creates a thick haze that reduces visibility even in VMC. The contrast between the sky and the ground diminishes.
The "Dry" Wet: Sometimes rain evaporates before it hits the ground (Virga), but the downdrafts (microbursts) are still there.
Rule of Thumb: In the Wet Season, the flight isn't over until the aircraft is tied down. Storms can develop rapidly. Always have an alternate airport with a sealed runway reachable with 60 minutes of fuel.
Part 5: The "Oh Sh*t" Kit (Survival)
CASA has specific regulations about survival equipment for "Remote Areas." Under Part 91 MOS Chapter 26 and CAO 20.11, if you are flying in a designated remote area (large portions of inland Australia), you must carry survival equipment appropriate to the area and the duration of the flight.
But regulations are minimums. The desert doesn't care about the regulations; it cares about physics. If you go down, you might be there for 24-48 hours before rescue. You need to be self-sufficient.
The Regulatory Minimum vs. The Practical Reality
CASA Requires:
Equipment for sustaining life (appropriate to the area).
Signaling equipment.
Water (implied under "sustaining life").
You Actually Need (The "Oh Sh*t" Kit):
1. Water, Water, Water The rule is 2-3 Litres per person, per day. Do not store this in one big container. Use multiple small bottles. If a big jerry can splits in the crash, you lose everything. Frozen water bottles act as ice bricks for your food and provide cold water as they melt.
2. Personal Locator Beacon (PLB) Your aircraft likely has an ELT (Emergency Locator Transmitter), but these are fixed to the airframe and often fail in a crash (antenna snaps off, fire, G-force damage). You need a PLB—a handheld unit usually clipped to your life jacket or belt. This stays with you. If you have to crawl out of a burning wreck, the PLB goes with you.
3. Signaling Mirror Old school, but fail-safe. A flash from a signaling mirror can be seen by a search aircraft from 10 miles away. It needs no batteries and works as long as the sun is shining—which it usually is in the desert.
4. Tie-Down Kit This is for the plane, not you. If you land at a remote strip and a storm rolls in, you need to secure the aircraft. Most bush strips don't have cables. Carry "claw" anchors or heavy-duty pegs, ropes, and a hammer. A Cessna 172 can be flipped by a 40kt gust if not secured.
5. Satellite Phone / Garmin inReach Mobile phone coverage ends 20km from town. A satellite tracker like a Garmin inReach allows you to send text messages ("Landed safely," or "Broken ankle, send help") via satellite. It provides peace of mind for family and a backup to the PLB.
6. First Aid for the Bush
Snake Bite Bandages: Compression bandages (Setopress or similar). Know the "Pressure Immobilization Technique." Australia has the most venomous snakes in the world; you are landing in their lounge room.
Burn Cream: For hot engine parts or sun.
Hydration Salts: Gastrolyte. You will be dehydrated.
The Golden Rule of Survival: Stay with the aircraft. The aircraft is a large, visible object (especially if you put a reflective shade on the windscreen). It provides shade. It has fuel and oil (which can be burned for smoke signals) and materials. Walking away into the bush is the most common cause of death in survival situations.

Part 6: Radio Procedures and the "Silent" Void
In the city, the radio is a constant chatter. In the bush, it can be silent for hours. This silence is dangerous. It lulls you into a false sense of solitude. You are never truly alone; there could be an RFDS King Air doing 250 knots on a reciprocal track, or a mustering chopper popping up from a creek bed.
Multicom 126.7 vs. Area VHF
For years, there has been confusion and debate about which frequency to use at remote, uncharted airstrips. This stems from changes made in 2013 and subsequent industry pushback.
The Rules (Simplified):
Location | Frequency | Purpose |
Marked Airstrips (Charted) | Published Frequency | Usually 126.7 (Multicom) or a discrete CTAF found in ERSA. |
Enroute | Area VHF | To ensure high-flying traffic (Jets/RFDS) monitoring Area freq are aware of you. |
Uncharted Airstrips (Circuit) | 126.7 (Multicom) | CASA allows discretion to use 126.7 in the circuit area to coordinate with other low-level traffic. |
The Debate: The debate arises because most low-level bush traffic (musterers, private pilots) sit on 126.7 all day. If you are on Area VHF, you might miss them. Conversely, if you are on 126.7, you miss the RPT (Regular Public Transport) traffic descending into the area.
My Advice (Hangar Talk): Monitor Area VHF enroute. When you get within 10 miles of your destination strip (even if uncharted), switch your primary com to 126.7 (Multicom) but keep monitoring Area VHF on the standby/second radio if you have one. This is called "Dual Watch."
Broadcast your intentions clearly on 126.7: "Traffic 126.7, Cessna 172 Alpha Bravo Charlie, 10 miles south of Birdsville, 3000, inbound for landing, estimating circuit time 15."
Part 7: Aircraft Preparation for the Bush
You’ve prepared yourself, but what about the machine? A standard flying school aircraft is set up for sealed runways and gentle handling. The bush is abrasive and demanding.
Wheel Spats: Leave Them at Home
Those fiberglass fairings over the wheels (spats) look aerodynamic, but in the bush, they are a liability.
Mud: If you land on a soft strip, mud packs inside the spat. It dries like concrete and acts as a brake, preventing the wheel from turning on takeoff.
Debris: Stones and sticks get trapped between the tire and the spat, shredding the tire sidewall.
Inspection: You cannot inspect the brake lines or tire condition properly with spats on. Remove them before you leave. It adds drag, but it adds safety.
Tires and Struts
Tires: Ensure you have plenty of tread. The "ply" rating matters. Higher ply tires resist the sharp stakes and stones of gibber plains better.
Struts: Check your oleo strut extension. You want maximum travel to absorb the bumps of a rough strip. A flat strut on a rough strip can damage the firewall.
Shimmy Dampers
The nose wheel of a tricycle gear aircraft is its weak point. On rough surfaces, the nose wheel can oscillate violently (shimmy). Ensure the shimmy damper is serviced and functional. If you have a choice, fly a taildragger—the nose wheel is the first thing to break in a hole.
Mooring Kits and Covers
You will be parking outside, likely without shade.
Pitot Cover: Essential. Mud wasps love pitot tubes. A blocked pitot tube means no airspeed indication—a critical emergency.
Cowl Plugs: Birds love nesting in warm cowlings.
Sun Shades: Reflective shades for the windows keep the avionics cool and prevent the interior plastic from melting.
Part 8: Legalities and FAQs
Landing on Roads
"It looks like a movie. Can I land on the highway to go to the pub?" Short Answer: No. Long Answer: CASR 91.410 states you can land anywhere that is "suitable." However, determining suitability is the pilot's responsibility. Roads present massive hazards:
Camber: Roads are crowned to drain water. This slope steers the aircraft towards the ditch.
Guide Posts: Those white plastic posts are exactly wingspan width apart. They will rip off a tailplane.
Power Lines: Often run parallel to roads, crossing them frequently.
Traffic: A road train cannot stop for you.
Legal: Most state police and local councils strictly prohibit landing on public roads without a permit and traffic control, unless it is a bona fide emergency (engine failure).
Do I need a Bush Flying Endorsement?
There is no specific "Bush Flying" endorsement on a license. However, the skills required (short field, soft field, navigation) are part of the PPL syllabus. Recommendation: Do not just rent a plane and go. Book a "Checkout" with an instructor who has bush experience. Ask to practice:
Precautionary Search and Landing (PSL).
Short Field Landings on grass/dirt.
Crosswind landings on narrow strips.
Best Time to Fly?
April to September.
Winter (Jun-Aug): crisp, clear days, smooth air, cold nights. Perfect flying weather.
Shoulder (Apr-May, Sep-Oct): Warmer, some thermals, but generally good.
Summer (Nov-Mar): fierce heat, turbulence, storms, flies, and very uncomfortable conditions. Avoid unless experienced.
Conclusion: The Bush Pilot Code
Flying the Australian Outback is a privilege. It connects you with the history of this country in a way that driving never can. You tread in the footsteps of Kingsford Smith, Flynn of the Inland, and the mail pilots who stitched the continent together.
But with that privilege comes responsibility. The "Old Pilots are Bold Pilots" saying is a myth. The old pilots I know in the bush are the most cautious people on earth. They walk the strip before they take off. They dip the tanks even when the gauge says full. They carry water. They respect the heat.
You are ready for this adventure. But do it right. Prepare your navigation, respect the weather, and treat every strip like a potential trap until you have proven it safe.
Take the Next Step: Don't just read about it.
Master your navigation techniques with our advanced PPL theory modules.
Prepare for the RPL & PPL Tests with our CASA-style practice exams.
Fly safe, keep the shiny side up, and I’ll see you at the Birdsville Pub.


Comments