
Mastering Weight and Balance: A Guide to the Alpha, Bravo, and Charlie Loading Systems
Updated: Aug 26
Why all three loading systems matter
Alpha, Bravo and Charlie can look like three unrelated exercises. In reality, each asks the same safety question: will the aeroplane remain within its approved weight and centre-of-gravity limits for the relevant stages of flight?
CASA continues to identify correct use of these loading systems as a common weak area in the PPLA exam. That is understandable. The arithmetic is usually straightforward, but the systems use different units, scales and plotting conventions. A method that works perfectly for Bravo can produce a confident but wrong answer if it is carried into Alpha or Charlie.
The best defence is a fixed workflow. Identify the system and its units, copy the starting data carefully, build the zero-fuel condition, add the fuel, and check every required point against the correct envelope. This guide shows how to apply that workflow without blurring the important differences between the three systems.
The worked questions below are original practice examples created from the current CASA workbook methodology and figures. They are not recalled or reproduced examination questions. Each result has been checked independently against the applicable arithmetic, scale divisions, weight limit and centre-of-gravity envelope.
Contents
What every loading system is solving
Weight tells you whether the aeroplane is below the applicable structural limit. Balance tells you where the centre of gravity sits relative to the approved forward and aft limits. You must satisfy both. Being below maximum take-off weight does not make an out-of-envelope loading acceptable.
The zero-fuel condition is the aeroplane with the required oil, occupants and baggage, but without usable fuel. The take-off condition adds the planned fuel. Depending on the question, you may also need to consider the landing condition after fuel has been consumed. A safe answer therefore checks the loading path, not only a single total.
In an exam, use the figures, units and loading data supplied for that question. In an aircraft, use its current approved flight manual, pilot operating handbook, loading system and actual loading information. The CASA workbook examples teach the technique; they are not substitutes for the documents belonging to the aeroplane you are about to fly.
Loading System Alpha: follow the graphical path
Alpha is primarily a graphical tracing exercise. You begin with the aeroplane's basic empty index at the top of the chart, then work downward through the occupant and baggage rows. At each row that contains a load, move horizontally by the appropriate amount in the direction shown by the arrow, then continue vertically to the next row.
The occupant rows each provide two alternative scales: 50 kg per division and 77 kg per division. You can use either scale. Choose whichever makes the particular weight easiest to plot accurately. For example, 100 kg is exactly two divisions on the 50 kg/div scale, while 154 kg is exactly two divisions on the 77 kg/div scale. Both scales represent the same loading calculation.
The baggage rows are simpler, with a scale of 10 kg per division.
How to work Alpha in a fixed order
Write down the basic empty weight and basic empty index first. Find the basic empty index on the scale at the top of the chart and draw a vertical line downward until you reach the Row 1 occupants line.
Add the Row 1 occupants by moving horizontally according to their weight and the arrow shown on the chart. From the new position, continue vertically to Row 2.
For Row 2, use either the forward-facing or aft-facing row according to the seating configuration in the question. Add the occupants in the same way, then bypass the unused Row 2 line and continue to Row 3.
After Row 3, continue through the nose baggage and rear baggage rows. Each baggage row uses 10 kg per division, and the arrows show whether the load moves the index to the left or right.
Once the occupants and baggage have been added, the resulting vertical line represents the zero-fuel moment index. Calculate the zero-fuel weight separately by adding the basic empty weight, occupants and baggage.
The fuel row in Loading System Alpha is marked NIL SCALE. The fuel tanks are located on the datum, so adding fuel changes the aeroplane's weight but produces no change in moment index. Do not move horizontally at the fuel row. Continue vertically on the same index line into the centre-of-gravity envelope.
Plot the zero-fuel weight and take-off weight on that vertical line. Both must remain within the CG envelope, and the take-off weight must not exceed the maximum take-off weight.
Worked Alpha exam-style question
Using Loading System Alpha Figure 7, determine whether this loading is acceptable at zero fuel and take-off.
Basic empty weight: 1,020 kg
Basic empty index: -220 index units
Row 1 occupants: 100 kg
Row 2 occupants, forward facing: 154 kg
Row 3 occupants: 100 kg
Nose baggage: 30 kg
Rear baggage: 20 kg
Fuel: 100 kg
First calculate the two weights.
Zero-fuel weight:
1,020 + 100 + 154 + 100 + 30 + 20 = 1,424 kg
Take-off weight:
1,424 + 100 = 1,524 kg
The take-off weight is below the 1,633 kg maximum shown on Figure 7.
Now trace the loading on the chart.
Start at -220 on the aircraft basic index scale and move vertically down to Row 1.
Row 1 contains 100 kg. Using the 50 kg/div scale, move two divisions to the left, following the direction of the arrow.
Continue vertically to the forward-facing Row 2 line. The Row 2 load is 154 kg. This time the 77 kg/div scale is convenient because 154 kg is exactly two divisions. Move two divisions to the right.
Bypass the unused aft-facing Row 2 line and continue to Row 3.
Row 3 contains 100 kg. Using the 50 kg/div scale, move two divisions to the right.
At the nose baggage line, 30 kg is three 10 kg divisions. Move three divisions to the left.
At the rear baggage line, 20 kg is two 10 kg divisions. Move two divisions to the right.
The horizontal position reached after the baggage rows is the zero-fuel moment index. Continue vertically through the fuel row because it is a nil scale. The 100 kg of fuel increases the weight but does not change the moment index.
Continue the same vertical line into the CG envelope and plot the two weights:
Zero-fuel weight: 1,424 kg
Take-off weight: 1,524 kg
Both points fall inside the CG envelope, and the take-off weight is below the 1,633 kg maximum. The loading is therefore acceptable at zero fuel and take-off.
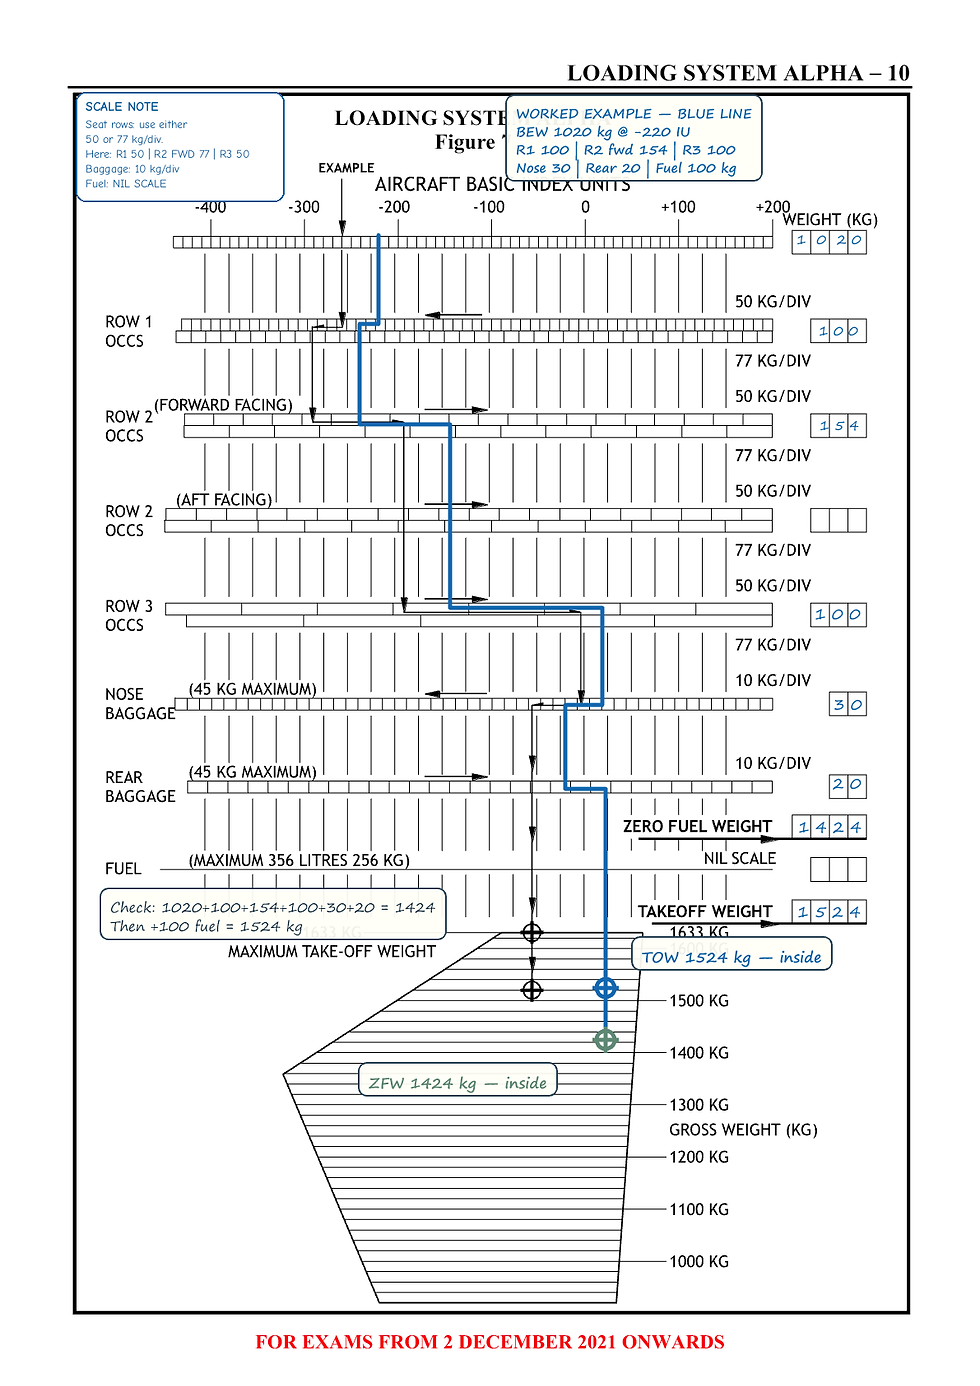
If an Alpha trace produces an unexpected result, check the starting index, the direction of each arrow, which Row 2 configuration is being used, the scale selected for each occupant row, and the baggage entries. Remember that the 50 kg/div and 77 kg/div scales are alternatives, while the fuel row produces no horizontal movement.
Loading System Bravo: add weights and moments
Bravo replaces the step-by-step index trace with a load sheet. Each item has a weight and a corresponding moment. Add the weights down one column and the moments down the other, keeping the two values paired.
The CASA Bravo example uses pounds for weight and moment/1,000 for the moment values. Each moment/1,000 value is calculated as weight × arm ÷ 1,000. Writing a raw moment into a moment/1,000 column, or silently switching between kilograms and pounds, changes the answer by far more than rounding ever could.
Start with the basic empty condition, then add the required engine oil, front-seat occupants, rear-seat occupants and baggage. The resulting totals are the zero-fuel weight and zero-fuel moment. Add the fuel weight and fuel moment to obtain the take-off values. Plot weight on the vertical axis and moment/1,000 on the horizontal axis of the correct envelope.
Bravo also provides category and station limits: Figure 8 shows 2,200 lb for normal operations, 1,850 lb for utility operations, 339 lb for cargo and 120 lb for baggage. Passing the overall weight check does not excuse exceeding a local baggage or category limit.
Worked Bravo exam-style question
Using Loading System Bravo Figure 8, calculate the zero-fuel and take-off coordinates and determine whether this normal-category loading is acceptable.
Empty weight: 1,280 lb at 79 inches
Oil: 15 lb at 32 inches
Pilot and co-pilot: 300 lb at 91 inches
Cargo compartment: 60 lb at 115 inches
Rear-seat passengers: 280 lb at 126 inches
Baggage: 20 lb at 151 inches
Fuel: 180 lb at 91 inches
Answer
Calculate each moment/1,000 using:
Moment/1,000 = Weight × Arm ÷ 1,000
The individual moments are:
Empty aeroplane: 1,280 × 79 ÷ 1,000 = 101.12
Oil: 0.48
Pilot and co-pilot: 27.30
Cargo: 6.90
Rear-seat passengers: 35.28
Baggage: 3.02
Before adding fuel, the totals are:
Zero-fuel weight = 1,955 lb
Zero-fuel moment/1,000 = 174.10
These are the coordinates to plot for the zero-fuel condition.
Now add the fuel:
180 × 91 ÷ 1,000 = 16.38 moment/1,000
This gives:
Take-off weight = 2,135 lb
Take-off moment/1,000 = 190.48
The cargo and baggage are both within their individual limits, and the take-off weight is below the 2,200 lb normal-category maximum.
Plot the two points on the normal-category envelope:
Zero fuel: 1,955 lb / 174.10
Take-off: 2,135 lb / 190.48
Both points fall inside the envelope, so the loading is acceptable.

A good Bravo sense-check is to scan every row horizontally before totalling. Each occupied weight cell should have the correct associated moment. Then scan vertically to confirm that you have not omitted a row or added fuel twice.
Loading System Charlie: calculate the CG position
Charlie uses kilograms and index units, but it does not finish with the index total alone. After adding the weight and index-unit columns, convert them into a centre-of-gravity position in millimetres aft of datum.
The CASA relationship is: CG in millimetres aft of datum equals index units multiplied by 100, divided by weight. One Charlie index unit represents 100 kg mm. Keep the factor of 100 visible in your working; losing it creates an obviously unrealistic CG position.
How to work the Charlie formula twice
First total the basic empty aeroplane, required oil, occupants and baggage. Use those zero-fuel totals in the CG formula and keep enough decimal places for accurate plotting. Then add fuel weight and fuel index units, recalculate the take-off CG, and plot both conditions on the Charlie envelope.
Charlie includes normal and utility-category limits as well as a baggage limit. The CASA example shows 1,115 kg maximum for normal operations, 925 kg for utility operations and 122 kg maximum baggage. Check the category the question asks about before deciding whether the point is acceptable.
Worked Charlie exam-style question
Using Loading System Charlie and Figure 9, calculate the zero-fuel and take-off centre-of-gravity positions and determine whether this normal-category loading is acceptable.
Empty weight: 687 kg and 19,522 index units
Full oil: 7 kg and 86.1 index units
Row 1 occupants: 150 kg
Row 2 occupants: 140 kg
Baggage: 30 kg
AVGAS: 100 litres at 0.72 kg/L
Answer
Use the arms in the Charlie data table to calculate the missing index units:
Row 1: 150 × 2,750 ÷ 100 = 4,125 index units
Row 2: 140 × 3,600 ÷ 100 = 5,040 index units
Baggage: 30 × 4,210 ÷ 100 = 1,263 index units
Before adding fuel, the totals are:
Zero-fuel weight = 1,014 kg
Zero-fuel index = 30,036.1 index units
Now calculate the zero-fuel CG:
30,036.1 × 100 ÷ 1,014 = 2,962.14 mm aft of datum
Next, add the fuel.
Using the workbook's value of 0.72 kg/L:
100 litres × 0.72 = 72 kg
At the 2,950 mm fuel arm, this contributes:
72 × 2,950 ÷ 100 = 2,124 index units
The take-off totals are therefore:
Take-off weight = 1,086 kg
Take-off index = 32,160.1 index units
Now calculate the take-off CG:
32,160.1 × 100 ÷ 1,086 = 2,961.34 mm aft of datum
Plot the two points on the normal-category envelope:
Zero fuel: 1,014 kg at 2,962.14 mm
Take-off: 1,086 kg at 2,961.34 mm
Both points fall inside the normal envelope, and the take-off weight is below the 1,115 kg maximum. The loading is therefore acceptable.
The slight forward movement after adding fuel also makes sense because the fuel arm lies forward of the zero-fuel CG.

A repeatable exam workflow
Use the same short sequence whenever a loading question appears. It reduces cognitive load and makes an error easier to find.
Circle or note the system name, units and category before calculating.
Copy the basic empty condition exactly, including its index or moment.
Check individual seat, baggage, cargo and station limits before adding totals.
Build and label the zero-fuel condition.
Add usable fuel once, using the supplied conversion where required.
Build and label the take-off condition, and landing condition if requested.
Plot the correct coordinates on the matching envelope.
Check maximum weight and both CG boundaries for every required condition.
When reading a graph, use a sharp pencil or a consistent digital method and project carefully to the axis. CASA allows reasonable tolerance for chart-derived answers, but tolerance does not rescue a wrong scale, wrong unit or wrong category. Keep the unrounded calculation for plotting and round only as the question instructs.
Common errors that cost marks
The first common error is mixing the systems. Alpha is a graphical trace, Bravo pairs weight with moment/1,000, and Charlie converts index units into millimetres aft of datum. Write the method at the top of your working page before touching the numbers.
The second is checking only take-off weight. A question may require zero-fuel and take-off points, and a real flight may require confirmation through fuel burn to landing. Every named condition needs its own weight and balance check.
The third is treating the envelope as a maximum-weight box. The sloping forward and aft boundaries matter. A point can be light enough but too far forward or aft. Plot the axes in the order printed and label each point so that weight is not accidentally placed on the CG axis.
The fourth is skipping local limits. Baggage, cargo, seat rows and operating categories can have lower limits than the aeroplane's overall maximum. Check them before calculating the final totals; otherwise you may spend time perfecting a loading that was already invalid.
The fifth is premature rounding. Keep the precision supplied by the data through additions and the Charlie division, then round at the end. At the same time, apply a reasonableness check. A lost factor of 100, an unconverted fuel volume or a transposed coordinate should look suspicious before you accept it.
How to practise until it feels automatic
Do not memorise the numbers in CASA's worked examples. Memorise the sequence of decisions. On a fresh problem, say aloud which system you have, which units it uses, what defines zero fuel, how fuel is added and which coordinates must be plotted.
After completing a question, change one item, move a passenger, reduce baggage or alter fuel, and predict the direction of CG movement before recalculating. That prediction builds the operational understanding behind the arithmetic and helps you spot results that do not make sense.
These systems become much easier when you work fresh numbers rather than rereading the same example. PPL Prep's CASA-style practice exams let you rehearse the chart choice, arithmetic and final envelope check under realistic pressure, so the video below is a useful next step if weight and balance is still slowing you down.


Comments